Configuring NGINX as Reverse Proxy (HTTP/HTTPS)
⚠️ All configurations made in this manual are simple and hypothetical examples. Adaptations will be necessary according to your environment topology.
🌐 Part 1 - Configuring NGINX as Load Balancer
Step 1 – Setting up the Topology
Add the NGINX Balancer with Public IPv4 at the load balancing layer. After that, apply the change.
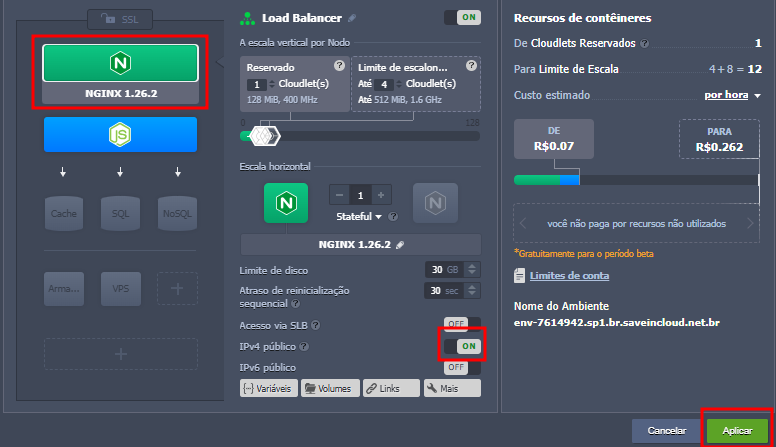
Step 2 – Domain Pointing
- Point your domain to the Public IP of NGINX.
- Access the directory
/etc/nginx/conf.d.
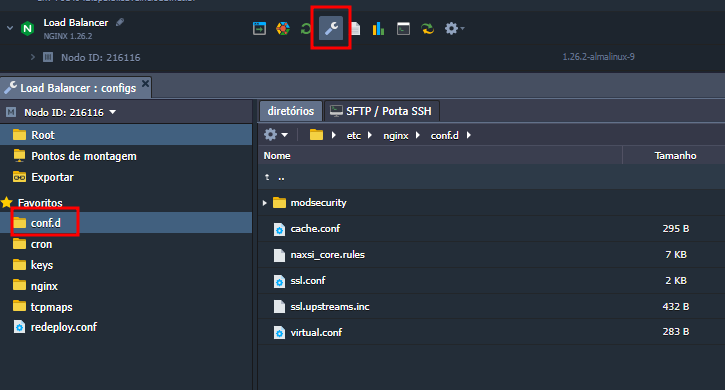
-
Create a configuration file for your domain.
-
Edit the created file with the content as in the example below.
HTTP Configuration
server {
        listen *:80;
        listen [::]:80;
        server_name dominio.com.br; #Coloque o domínio de acesso aqui
        #        A linha abaixo redireciona o acesso para HTTPS, na porta 443
        #        Caso ela esteja sendo utilizada, o restante do código desse bloco server abaixo dela não precisa ser utilizado
        #        return 301 https://$host$request_uri;

        access_log /var/log/nginx/dominio.access_log main; #troque dominio pelo nome desejado para logs de acesso e erro
        error_log /var/log/nginx/dominio.error_log info;

        proxy_temp_path /var/nginx/tmp/;
        proxy_connect_timeout 5s;

        error_page 500 502 503 504 /50x.html;
        location = /50x.html {
                root html;
        }

        proxy_next_upstream error timeout http_500;
        proxy_http_version 1.1;
        proxy_set_header Host $host;
        proxy_set_header X-Real-IP $remote_addr;
        proxy_set_header X-Host $http_host;
        proxy_set_header X-Forwarded-For $proxy_add_x_forwarded_for;
        proxy_set_header X-Remote-Port $remote_port;
        proxy_set_header X-URI $request_uri;
        proxy_set_header X-ARGS $args;
        proxy_set_header Refer $http_refer;
        proxy_set_header Upgrade $http_upgrade;
        proxy_set_header Connection "upgrade";

        location / {
                proxy_pass http://200.150.194.160; # IP e porta da Instancia onde está a aplicação
                add_header Set-Cookie "SRVGROUP=$group; path=/; HttpOnly";
        }
}
💾 After editing, save the changes and test the syntax inside the nginx SSH using the command nginx -t like this:
nginx -t

nginx: [warn] the "user" directive makes sense only if the master process runs with super-user privileges, ignored in /etc/nginx/nginx.conf:1
nginx: the configuration file /etc/nginx/nginx.conf syntax is ok
nginx: configuration file /etc/nginx/nginx.conf test is successful
If everything is okay, Restart the NGINX instance

📘 Additional documentation: manual-nginx.jelastic.saveincloud.net
🔐 Adding the SSL Certificate (HTTPS)
Step 1 – Installing Let’s Encrypt
Install the Let's Encrypt Free SSL add-on, filling in the domain that points to NGINX.
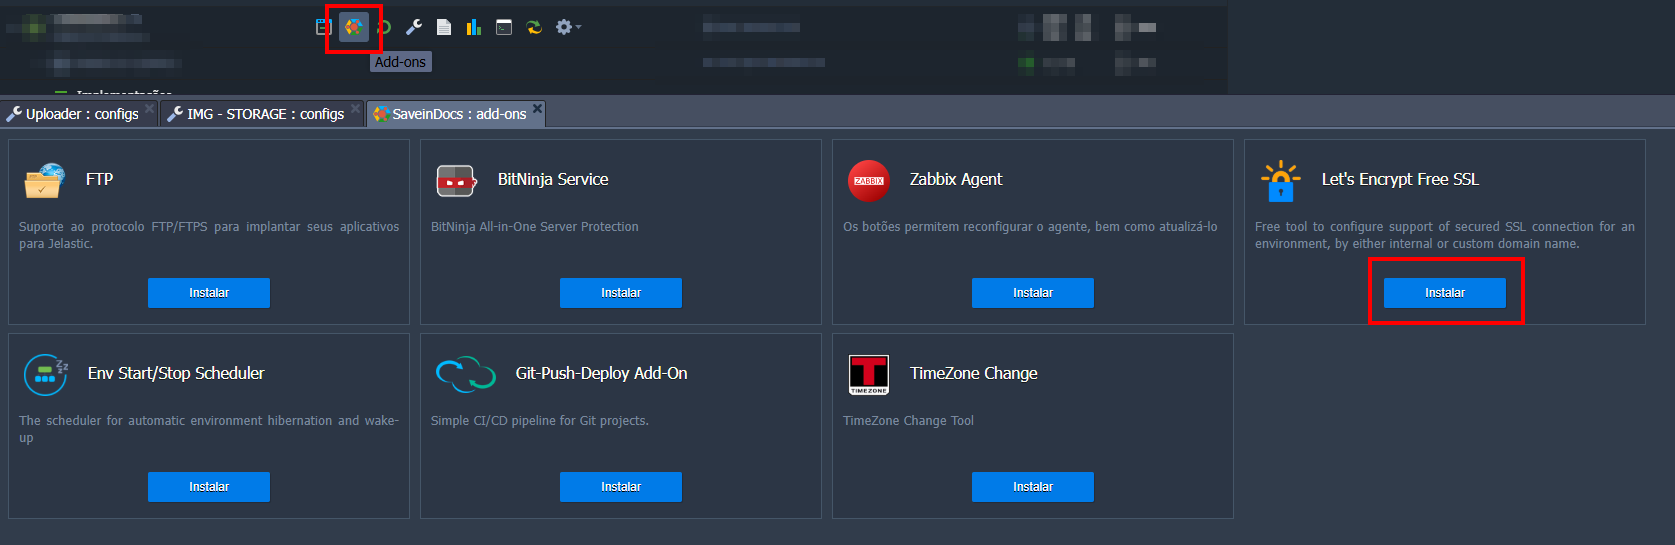
Step 2 – Port 443 on NGINX
Edit the same file created in NGINX, adding the configuration for HTTPS:
server {
        listen *:443 ssl;
        listen *:443 quic;
        listen [::]:443 ssl;
        listen [::]:443 quic;
        http2 on;
        server_name dominio.com.br; #Coloque o domínio de acesso aqui

        ssl_certificate /var/lib/jelastic/SSL/jelastic.chain;
        ssl_certificate_key /var/lib/jelastic/SSL/jelastic.key;
        ssl_session_timeout 5m;
        ssl_protocols TLSv1.2 TLSv1.3;
        ssl_ciphers ECDHE-ECDSA-AES128-GCM-SHA256:ECDHE-RSA-AES128-GCM-SHA256:ECDHE-ECDSA-AES256-GCM-SHA384:ECDHE-RSA-AES256-GCM-SHA384:ECDHE-ECDSA-CHACHA20-POLY1305:ECDHE-RSA-CHACHA20-POLY1305:DHE-RSA-AES128-GCM-SHA256:DHE-RSA-AES256-GCM-SHA384;
        ssl_prefer_server_ciphers off;
        ssl_session_cache shared:SSL:10m;
        add_header alt-svc 'h3=":443"; ma=86400';

        access_log /var/log/nginx/dominio.com.br.access_log main; #troque dominio pelo nome desejado para logs de acesso
        error_log /var/log/nginx/dominio.com.br.error_log info; #troque dominio pelo nome desejado para logs de erro

        proxy_temp_path /var/nginx/tmp/;

        error_page 500 502 503 504 /50x.html;
        location = /50x.html {
                root html;
        }

        location / {
                proxy_pass http://127.0.0.1; # IP da Instancia onde está a aplicação
                proxy_next_upstream error;
                proxy_http_version 1.1;
                proxy_set_header Upgrade $http_upgrade;
                proxy_set_header Connection "upgrade";
                proxy_set_header Host $host;
                proxy_set_header X-Real-IP $remote_addr;
                proxy_set_header X-Host $http_host;
                proxy_set_header X-Forwarded-For $proxy_add_x_forwarded_for;
                proxy_set_header X-URI $request_uri;
                proxy_set_header X-ARGS $args;
                proxy_set_header Refer $http_refer;
                proxy_set_header X-Forwarded-Proto $scheme;
                proxy_set_header Ssl-Offloaded "1";
        }
}
✅ Save and restart NGINX again. Your site will be accessible with HTTPS and a valid certificate.
🔁 Configuration with upstream (Multiple Instances)
If you have more than one instance of your application (for example, for scalability or high availability), it is ideal to use the upstream block in NGINX. This way, NGINX will act as a load balancer between these instances.
📌 Configuration example with upstream
upstream app_backend {
    server 192.168.0.101:8080;
    server 192.168.0.102:8080;
    server 192.168.0.103:8080;
    # Você pode adicionar mais servidores conforme necessário
}
Then, in your server block, point the proxy_pass to this group of servers:
location / {
    proxy_pass http://app_backend; # <--- coloque seu upstream aqui
    ...
    ...
}
ℹ️ Additional details:
- NGINX will distribute requests among the instances listed in
upstream. - The default balancing is round-robin, but you can use other options like
least_connorsticky_sessions, if necessary.
🛠️ Troubleshooting – Common Issues
❌ Error configuring HTTPS without certificate
⚠️ If you add the port 443 configuration in NGINX without installing the SSL certificate (Let's Encrypt), the service may fail to restart, showing an error similar to:
nginx: [emerg] BIO_new_file("/var/lib/jelastic/SSL/jelastic.chain") failed (SSL: error:02001002:system library:fopen:No such file or directory)
💡 To avoid this error:
- Make sure to install the Let's Encrypt certificate before enabling the
serverblock on port 443. - If you are still testing or want to avoid the failure temporarily, comment out or remove the HTTPS configuration until the certificate is available.