🔐 How to Perform SSH Access
SSH (Secure Shell) is the standard protocol for secure remote access to Linux virtual machines. All communication is encrypted, ensuring credentials and data are transmitted securely. On the Nuvion platform, you can authenticate in two ways: by key pair (recommended) or by password.
🔑 SSH Access with Key Pair
Access via SSH with key pair is one of the most secure ways to connect to a virtual machine. Unlike password authentication, the key pair uses asymmetric encryption: a public key (which can be shared) and a private key (which must be kept absolutely secret). Only those who have the private key corresponding to the public key registered on the server will be able to authenticate successfully.
⚙️ Options for Generating and Using a Key Pair
You can generate your SSH key pair in different ways, depending on your operating system and available tools. Choose the option that best fits your environment:
1. 🖥️ via Command Line (CLI)
Use the command ssh-keygen to generate the key pair directly via PowerShell (Windows) or Bash (Linux).
Example of generation with the Ed25519 algorithm:
ssh-keygen -t ed25519
Expected output:
Generating public/private ed25519 key pair.
Enter file in which to save the key (C:\Users\usuario/.ssh/id_ed25519): <nome-do-arquivo>
Enter passphrase (empty for no passphrase): <senha-para-acesso> (opcional)
Enter same passphrase again: <confirmar-senha>
Your identification has been saved in <nome-do-arquivo>
Your public key has been saved in <nome-do-arquivo.pub>
The key fingerprint is:
SHA256:fxU/OXDdzorQmMLdAm7KzkXFiYoGmYpcPD0k9emSQxs
The key's randomart image is:
+--[ED25519 256]--+
|   ..o           |
|  .o+ . .o .    o|
|  ++ E oo +  ...o|
|o...o.*+ + =  o=.|
|o.  o=..S * o .++|
|   . .o+ o o o .o|
|      o . . o .  |
|     o .   .     |
|      o          |
+----[SHA256]-----+
💡 Useful options for
ssh-keygen:
-t— sets the algorithm type (e.g.,rsa,ed25519)-b— sets the key size in bits-C— adds an identifying comment to the key
If no path is specified in the Enter file in which to save the key field, the key will be created in the directory where the command was executed. The recommended default directory is C:\Users\<usuario>\.ssh\.
Viewing the public key content:
After generating the key pair, copy the content of your public key (file with extension .pub) using the command cat via CLI:
PS C:\Users\usuario\.ssh> cat .\nuvion-ssh.pub
ssh-ed25519 AAAAC3NzaC1lZDI1NTE5AAAAIFg/oweGFRyGwrw9gPOZ8QO8rMtg93pMCExBLtY2cSCM Acesso SSH com par de chaves
📋 Copy all the displayed content — including the
ssh-ed25519prefix and the comment at the end — as it will be necessary when registering the key on the Nuvion platform.
2. 🔑 PuTTYgen (Windows)
PuTTYgen is a graphical tool for generating SSH keys, ideal for users who prefer a visual interface.
You need to have PuTTYgen and PuTTY installed on your computer. PuTTYgen is installed together with the PuTTY package, so separate installation is not required.
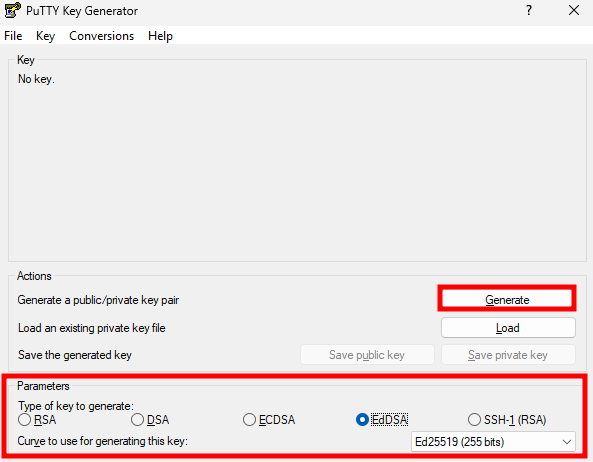
Step 1 — Configure and start generation:
With PuTTYgen open, select the desired algorithm type (e.g., EdDSA / Ed25519) and the key bit length. Then click Generate.
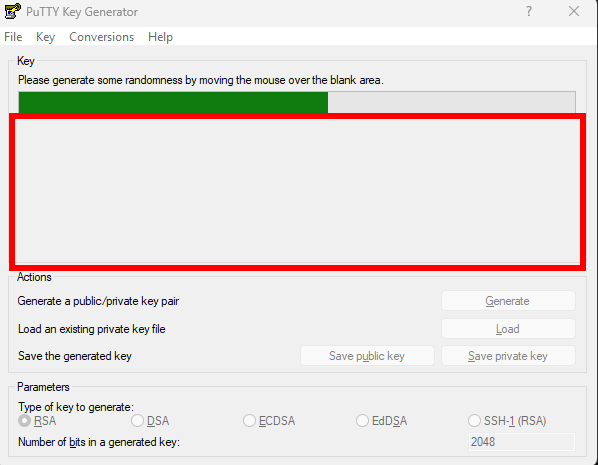
Step 2 — Generate entropy by moving the cursor:
To complete the key pair creation, move the cursor randomly within the red highlighted area. This ensures sufficient entropy for secure key generation.
Step 3 — Save the keys:
After generation, you can add a comment to the key and set a passphrase for protection. Click Save public key and Save private key to save both.
The private key is confidential and must be stored in a safe place. Its leakage compromises the security of all SSH authentication and, consequently, your virtual machine.
Example of generated public key:
ssh-ed25519 AAAAC3NzaC1lZDI1NTE5AAAAIAYl1fXJRh1Ecjg0/+bcitItBskxiwhjoa9RXTWPk93S <comentario>
3. ☁️ Adding the Public Key on the Nuvion Platform
With the key pair generated, it is time to register your public key on the Nuvion platform to use it when creating and accessing your virtual machines.
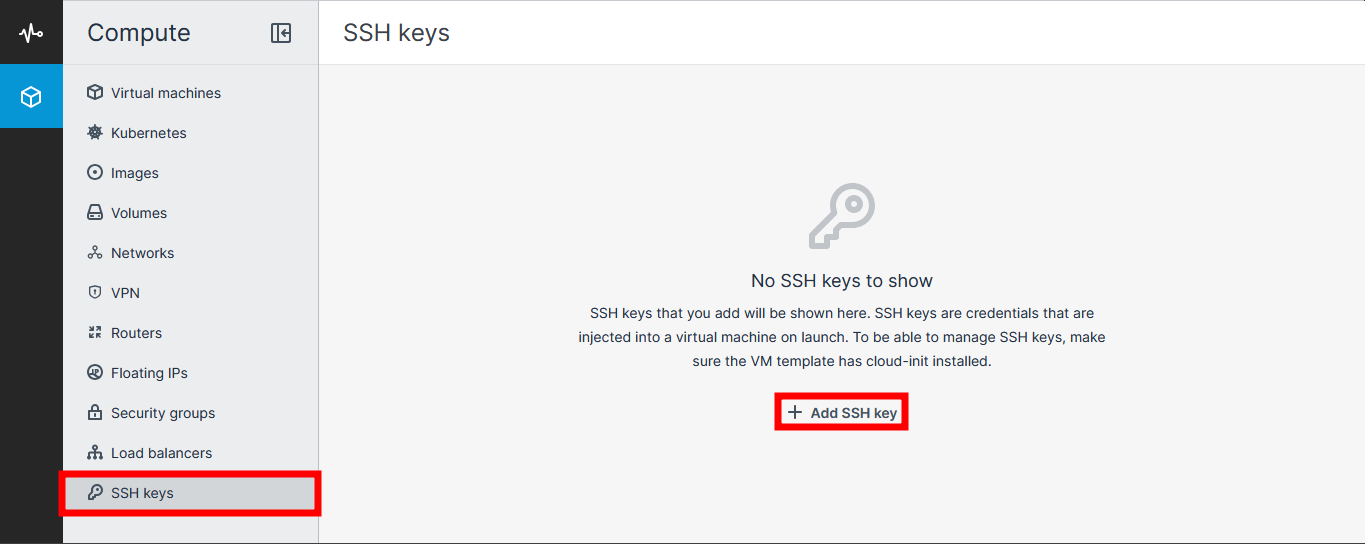
Step 1 — Access the SSH key manager:
Log in to the Nuvion platform and navigate to SSH Keys > Add SSH Key.
Step 2 — Fill in the key information:
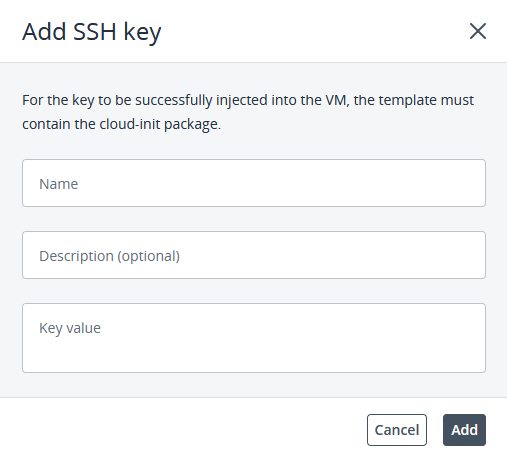
Fill in the fields as indicated:
- Name — A friendly identifier for the key (e.g.,
minha-chave-trabalho) - Description — Optional field to detail the key’s use
- Key value — Paste here the complete content of your public key (
.pub)
Step 3 — Confirm registration:
Click Add to complete the registration. Your public key will be available and can be selected during the creation of your VM.

4. 💻 Access via CMD (Windows)
With the key registered and the VM created, you can now perform SSH access directly via the Command Prompt (CMD).
Basic connection command:
ssh <usuario>@<IP-PUBLICO>
Example:
C:\Users\gusta> ssh [email protected]
By default, SSH connects on port 22 and automatically uses keys with standard names (id_rsa, id_ed25519, etc.) located in the .ssh directory.
You can customize the connection with the following parameters:
-i— Specifies the path to the private key-p— Specifies the SSH port
Example with custom parameters:
ssh -i <caminho/chave-privada> -p <numero-porta-ssh> <usuario>@<IP-publico>
5. 🐢 Access via PuTTY (Windows)
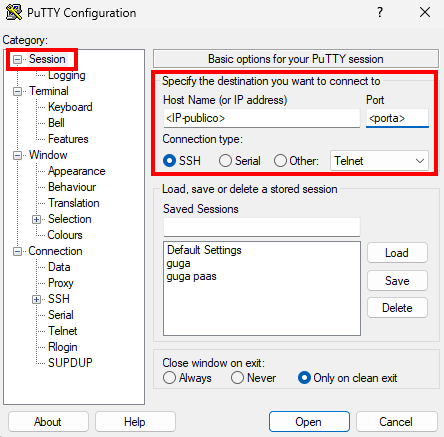
PuTTY is a widely used graphical SSH client on Windows. Follow the steps below to configure the connection.
Step 1 — Configure host and port:
Open PuTTY and, in the Session tab, fill in:
- Host Name (or IP address) — Public IP of your virtual machine
- Port — SSH port number (default:
22) - Connection type — Select
SSH
Step 2 — Load the private key:
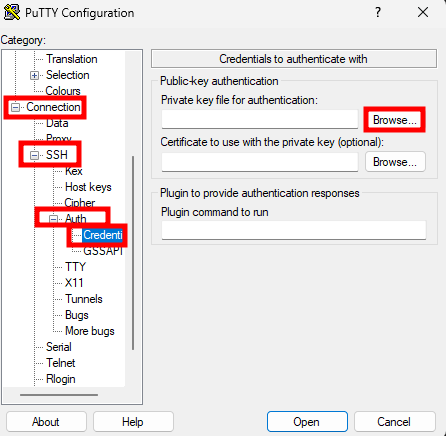
Navigate to Connection > SSH > Auth > Credentials and click Browse to locate and load your private key file (.ppk for keys generated by PuTTYgen).
After loading the key, click Open to start the connection to the server.
✅ Flow Summary
1. Gerar par de chaves (via ssh-keygen ou PuTTYgen)
        ↓
2. Cadastrar chave pública na plataforma Nuvion
        ↓
3. Selecionar a chave ao criar a VM
        ↓
4. Conectar via CMD ou PuTTY usando a chave privada
🔒 SSH Access with Password
Password authentication allows connecting to the VM by providing only the user, password, and IP, without needing to manage key files. Although simpler, it is less secure than key pair authentication and requires manual configuration on the server, as this mode is disabled by default on images on the Nuvion platform.
Always prefer access by key pair. Password authentication is more susceptible to brute force attacks. If you choose to enable it, use long and complex passwords and consider changing the default SSH port.
🛠️ Enabling Password Authentication
To enable password authentication, you will first need to access the VM via key pair and then perform the manual configuration.
Step 1 — Access the VM via key pair:
ssh <usuario>@<ip-flutuante>
Step 2 — Elevate to root user:
sudo su
Step 3 — Edit the SSH configuration file:
Using a text editor of your choice (nano, vi, ee), open the file:
nano /etc/ssh/sshd_config.d/50-cloud-init.conf
Locate the directive below and change the value from no to yes:
- PasswordAuthentication no
+ PasswordAuthentication yes
Step 4 — Set a password for the user:
passwd <usuario>
Step 5 — Restart the SSH service to apply changes:
systemctl restart sshd
Step 6 — Test password access:
Now, from any terminal or SSH client (PuTTY, Termius, MobaXTerm, etc.), connect using user, password, and floating IP:
ssh <usuario>@<ip-flutuante>
<usuario>@<ip-flutuante>'s password:
If you prefer, it is possible to perform this configuration automatically when creating your virtual machine, using a custom script with cloud-config in the VM’s user data field.
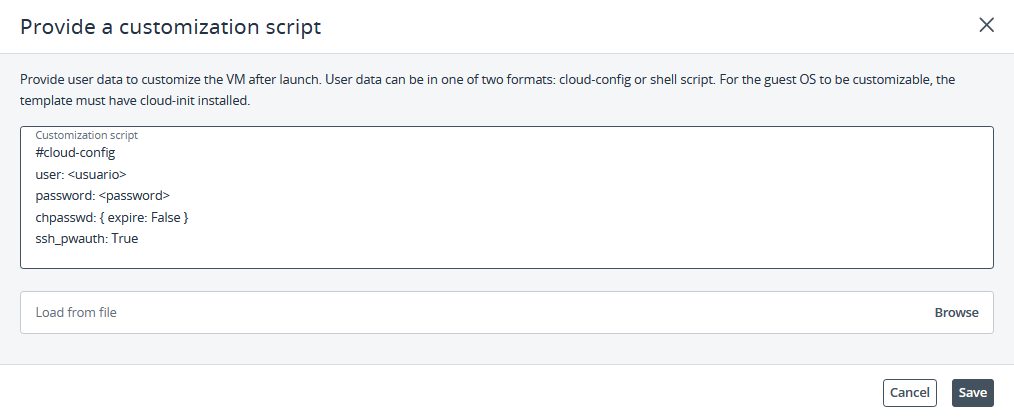
⚠️ The guest operating system must have cloud-init installed for automatic configuration to work. All images available on the Nuvion platform already have cloud-init installed.
The instructions above are based on distributions natively available on the Nuvion platform. If you use a custom image, check which file is responsible for the password authentication directive on your operating system, as the path may differ from /etc/ssh/sshd_config.d/50-cloud-init.conf.
✅ Flow Summary — user and password
1. Acessar a VM via par de chaves
        ↓
2. Elevar para root com sudo su
        ↓
3. Editar /etc/ssh/sshd_config.d/50-cloud-init.conf
   e definir PasswordAuthentication yes
        ↓
4. Definir senha do usuário com passwd <usuario>
        ↓
5. Reiniciar o serviço SSH com systemctl restart sshd
        ↓
6. Conectar via terminal ou cliente SSH com usuário e senha
💻 Access via Console
The Console is a way to access the virtual machine directly through the Nuvion platform interface, without the need for an external SSH client. It is especially useful in emergency situations — such as when network connectivity is compromised, the SSH service is inaccessible, or remote access credentials are lost.
Step 1 — In the virtual machines list, click on your VM to access its details.
Then, click the Console button.
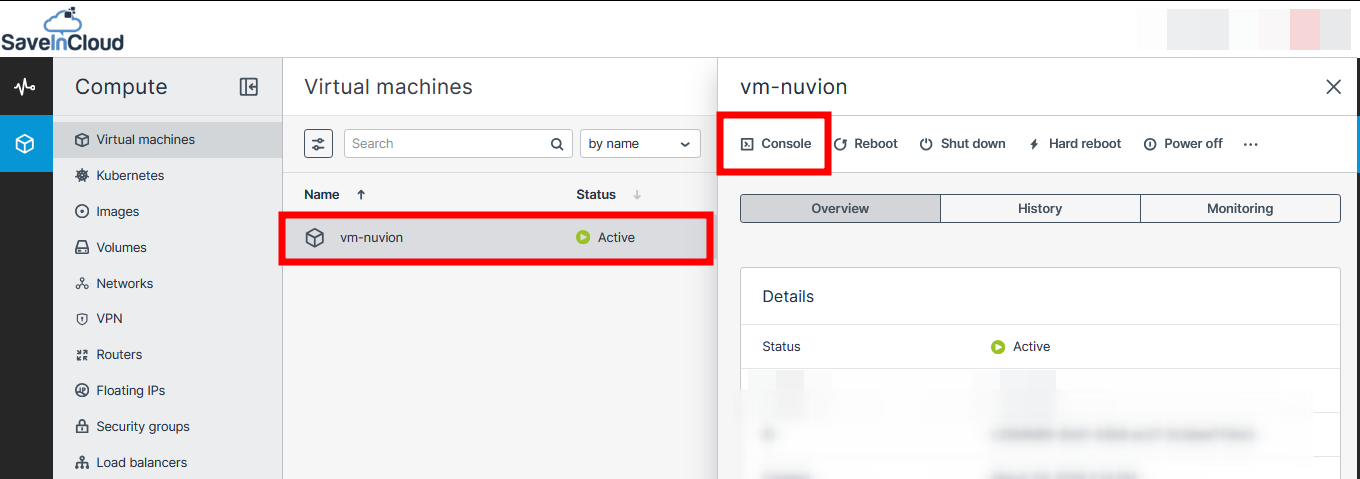
Step 2 — A new window will open with the VM terminal. Enter the user and password to authenticate directly into the operating system.
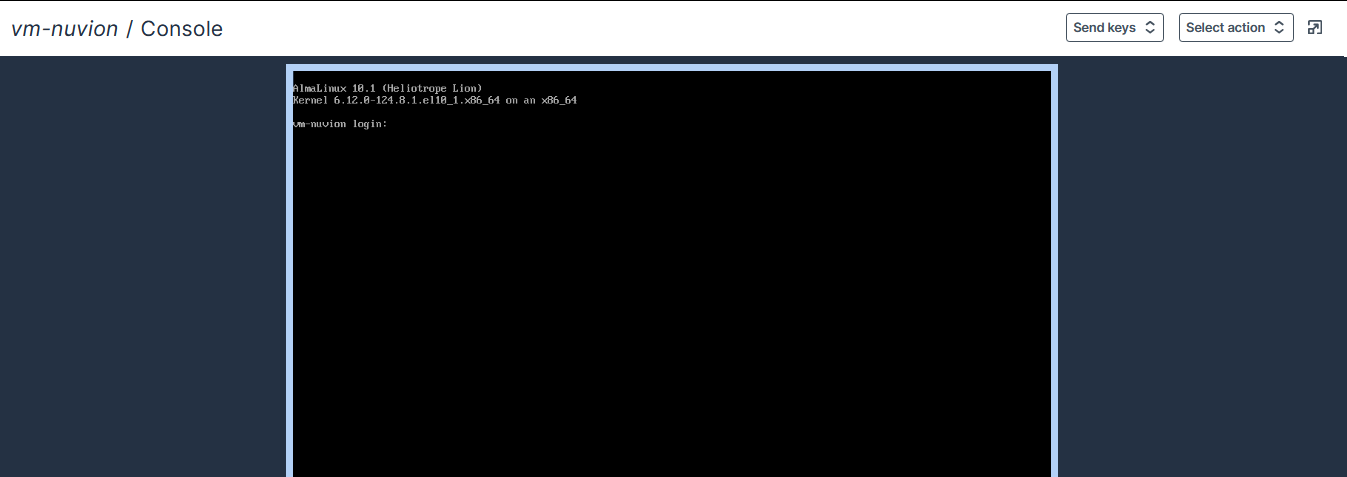
Console access works independently of the VM’s network — it connects directly to the hypervisor. Therefore, even if the VM has no floating IP or SSH is misconfigured, the Console will still be available as an alternative access and recovery method.
- Always prefer key pair — it is more secure than password authentication and not subject to brute force attacks.
- Always use the Ed25519 algorithm — it is more secure and efficient than RSA.
- Set a passphrase to protect your private key, even if optional.
- Never share your private key with third parties.
- Make backups of your private key in a secure and encrypted location.
- Prefer to use different keys for different environments (development, production, etc.).
- If enabling password authentication, use long and unique passwords and consider tools like a password manager.
🧠 Questions?
Contact technical support and send your question — we are ready to help you!