🏗️ Criando uma VM com Terraform
O Terraform é uma ferramenta de Infraestrutura como Código (IaC — Infrastructure as Code) desenvolvida pela HashiCorp. Com ele, você descreve toda a sua infraestrutura em arquivos de configuração declarativos, permitindo provisionar, modificar e destruir recursos de forma automatizada, versionável e reproduzível.
Ao utilizar o Terraform com a plataforma Nuvion, você obtém benefícios como:
- 🔁 Reprodutibilidade — recrie ambientes idênticos com um único comando
- 📋 Versionamento — controle mudanças na infraestrutura com Git
- ⚡ Agilidade — provisione múltiplos recursos em paralelo de forma automática
- 🔍 Auditabilidade — todo o estado da infraestrutura fica registrado em código
Antes de começar, certifique-se de que o Terraform está instalado na sua máquina. Você pode baixá-lo em https://developer.hashicorp.com/terraform/downloads.
Verifique a instalação com:
terraform -version
🔑 Passo 1 — Gerando as credenciais OpenStack
O provider utilizado é o OpenStack, que possui compatibilidade nativa com a plataforma Nuvion. Para que o Terraform possa se autenticar e gerenciar recursos, é necessário gerar credenciais de aplicação (Application Credentials).
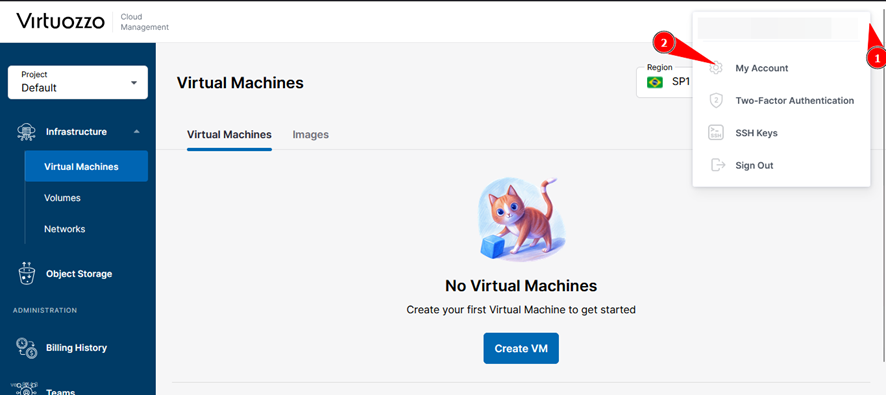
Acesse sua conta e navegue até My Account > OpenStack Credentials.
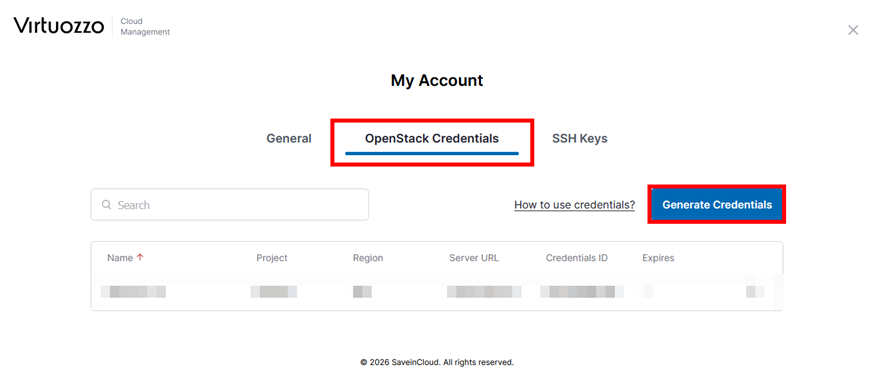
Clique em Generate Credentials para iniciar a criação das credenciais de acesso.
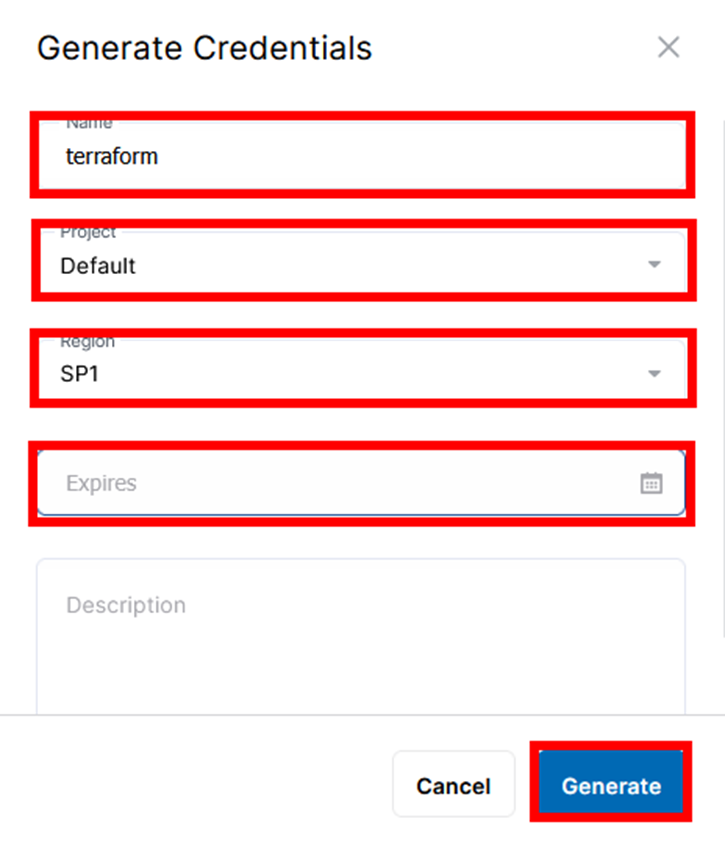
Preencha o formulário com as informações necessárias:
| Campo | Descrição |
|---|---|
| Nome | Identificador amigável para a credencial |
| Projeto | Projeto ao qual a credencial estará vinculada |
| Região | Região de atuação da credencial |
| Data de expiração | Deixe em branco para que a credencial nunca expire |
| Descrição | Campo opcional para descrever o uso da credencial |
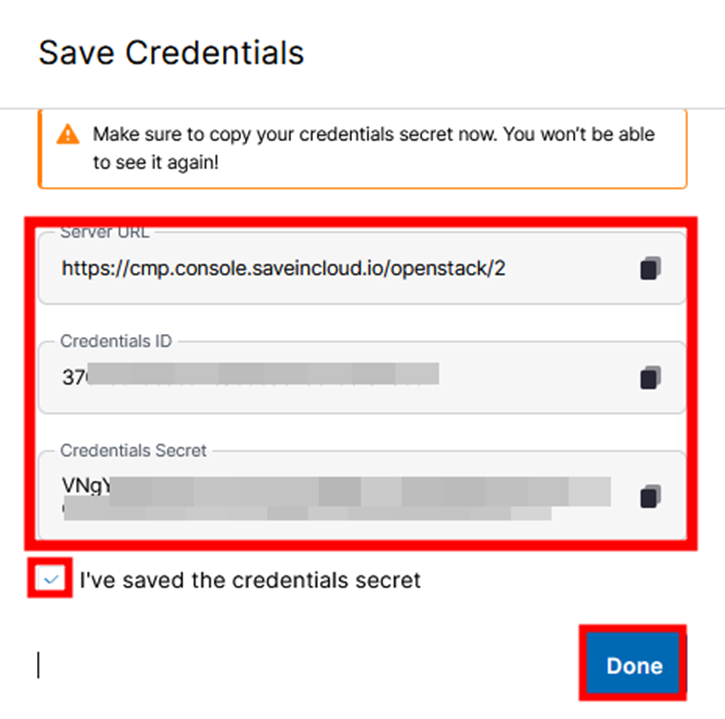
Após gerar, salve imediatamente os seguintes dados — eles serão utilizados na configuração do Terraform:
- 🔗 Server URL — endpoint de autenticação da API OpenStack
- 🪪 Credentials ID — identificador único da credencial
- 🔐 Credentials Secret — segredo associado à credencial
O Credentials Secret é exibido apenas uma vez. Caso não seja salvo neste momento, será necessário gerar um novo par de credenciais.
📁 Passo 2 — Estrutura dos arquivos de configuração
A configuração básica do Terraform é dividida em três arquivos principais. Essa separação é uma boa prática que facilita a manutenção, o versionamento e o reuso das configurações.
.
├── provider.tf          # Configuração do provider OpenStack
├── terraform.tfvars     # Valores das variáveis (credenciais e endpoints)
├── 00-variables.tf      # Declaração das variáveis utilizadas
├── ssh-keypair.tf       # Gerenciamento do par de chaves SSH via Terraform
└── instance.tf          # Definição da VM e dos recursos associados
📄 provider.tf
Define a versão mínima do Terraform e configura o provider OpenStack, informando as credenciais e a região por meio de variáveis.
terraform {
  required_version = ">= 0.14.0"
  required_providers {
    openstack = {
      source  = "terraform-provider-openstack/openstack"
      version = "~> 1.53.0"
    }
  }
}

provider "openstack" {
  application_credential_id     = var.application_credential_id
  application_credential_secret = var.application_credential_secret
  auth_url                      = var.os_auth_url
  region                        = var.os_region
}
📄 terraform.tfvars
Arquivo onde os valores reais das variáveis são definidos. Substitua os campos entre < > pelos dados obtidos ao gerar as credenciais OpenStack.
application_credential_id     = "<credentials-id>"
application_credential_secret = "<credentials-secret>"
os_auth_url                   = "https://cmp.console.saveincloud.io/openstack/2"
os_region                     = "RegionOne"
terraform.tfvarsEste arquivo contém informações sensíveis. Adicione-o ao .gitignore do seu repositório para evitar que as credenciais sejam expostas acidentalmente em sistemas de controle de versão.
# .gitignore
terraform.tfvars
*.tfstate
*.tfstate.backup
.terraform/
📄 00-variables.tf
Declara as variáveis utilizadas pelo provider, sem atribuir valores — eles são lidos do terraform.tfvars em tempo de execução.
variable "application_credential_id" {}
variable "application_credential_secret" {}
variable "os_auth_url" {}
variable "os_region" {}
🔑 Passo 3 — Gerenciando o par de chaves SSH com ssh-keypair.tf
O arquivo ssh-keypair.tf permite que o par de chaves SSH utilizado para acesso à VM seja gerenciado diretamente pelo Terraform, centralizando toda a infraestrutura em código e eliminando a necessidade de cadastrar a chave manualmente na plataforma.
resource "openstack_compute_keypair_v2" "<ssh-keypair-resource-id>" {
  name       = "<name>"
  public_key = "<chave-publica>"
}
📖 Descrição dos campos
| Campo | Descrição |
|---|---|
<ssh-keypair-resource-id> | Identificador lógico do recurso no Terraform (ex.: keypair_nuvion) |
name | Nome do par de chaves que será exibido na plataforma Nuvion (ex.: minha-chave-terraform) |
public_key | Conteúdo da sua chave pública (ex.: ssh-ed25519 AAAA...) — o mesmo valor cadastrado manualmente em SSH Keys na plataforma |
O valor de public_key é o conteúdo do arquivo .pub gerado pelo ssh-keygen ou PuTTYgen. Para exibi-lo no terminal, utilize:
cat ~/.ssh/id_ed25519.pub
Copie a saída completa, incluindo o prefixo ssh-ed25519 e o comentário ao final.
Após declarar o recurso openstack_compute_keypair_v2, referencie-o no instance.tf pelo atributo name do recurso criado:
key_pair = openstack_compute_keypair_v2.<ssh-keypair-resource-id>.name
Isso garante que o Terraform aplique as dependências na ordem correta — criando o keypair antes de provisionar a VM.
🖥️ Passo 4 — Definindo a VM com instance.tf
O arquivo instance.tf declara todos os recursos necessários para provisionar a máquina virtual: a imagem do sistema operacional, o volume de armazenamento e a instância de computação em si.
# -------------------------------------------------------
# 1. Busca a imagem do sistema operacional mais recente
# -------------------------------------------------------
data "openstack_images_image_v2" "<data-resource-id>" {
  name        = "<nome-da-imagem>"
  most_recent = true
}

# -------------------------------------------------------
# 2. Cria o volume de armazenamento (disco da VM)
# -------------------------------------------------------
resource "openstack_blockstorage_volume_v3" "<volume-resource-id>" {
  name     = "<nome-do-volume>"
  size     = <tamanho-do-volume>
  image_id = data.openstack_images_image_v2.<data-resource-id>.id
}

# -------------------------------------------------------
# 3. Provisiona a instância de computação (VM)
# -------------------------------------------------------
resource "openstack_compute_instance_v2" "<compute-resource-id>" {
  name            = "<nome-vm>"
  flavor_name     = "<flavor>"
  key_pair        = openstack_compute_keypair_v2.<ssh-keypair-resource-id>.name
  security_groups = ["default"]

  network {
    name = "<nome-da-rede>"
  }

  block_device {
    uuid                  = openstack_blockstorage_volume_v3.<volume-resource-id>.id
    source_type           = "volume"
    destination_type      = "volume"
    boot_index            = 0
    delete_on_termination = true
  }
}
📖 Descrição dos campos
data "openstack_images_image_v2"
| Campo | Descrição |
|---|---|
<data-resource-id> | Identificador lógico do recurso dentro do Terraform (ex.: ubuntu_22) |
name | Nome exato da imagem disponível na plataforma (ex.: Ubuntu 22.04) |
most_recent | Quando true, seleciona a versão mais recente da imagem caso haja múltiplas correspondências |
resource "openstack_blockstorage_volume_v3"
| Campo | Descrição |
|---|---|
<volume-resource-id> | Identificador lógico do volume no Terraform (ex.: vm_boot_volume) |
name | Nome do volume que será exibido na plataforma |
size | Tamanho do volume em GB (ex.: 50) |
image_id | Referência à imagem obtida pelo bloco data acima |
resource "openstack_compute_instance_v2"
| Campo | Descrição |
|---|---|
<compute-resource-id> | Identificador lógico da instância no Terraform (ex.: minha_vm) |
name | Nome da VM exibido na plataforma |
flavor_name | Tipo de instância que define CPU, RAM e recursos (ex.: m1.small) |
key_pair | Referência ao par de chaves SSH criado pelo recurso openstack_compute_keypair_v2 |
security_groups | Lista de grupos de segurança aplicados à instância |
network.name | Nome da rede à qual a VM será conectada |
block_device.uuid | Referência ao volume criado anteriormente |
block_device.source_type | Origem do dispositivo de boot — volume indica um volume em bloco |
block_device.destination_type | Destino do dispositivo — volume para armazenamento persistente |
block_device.boot_index | Ordem de boot — 0 indica o disco principal |
block_device.delete_on_termination | Quando true, o volume é excluído junto com a VM ao destruir o recurso |
🚀 Passo 4 — Executando o Terraform
Com todos os arquivos configurados, execute os comandos a seguir no diretório do projeto:
# Inicializa o projeto e baixa o provider OpenStack
terraform init

# Exibe um plano detalhado de todos os recursos que serão criados
terraform plan

# Aplica as configurações e provisiona os recursos na plataforma
terraform apply
applyO comando terraform apply solicitará uma confirmação antes de criar os recursos. Digite yes para prosseguir. Utilize a flag -auto-approve para ambientes de CI/CD onde a confirmação manual não é desejada.
✅ Resumo do fluxo
1. Gerar credenciais OpenStack na plataforma Nuvion
        ↓
2. Criar os arquivos provider.tf, terraform.tfvars e 00-variables.tf
        ↓
3. Declarar o par de chaves SSH no arquivo ssh-keypair.tf
        ↓
4. Definir os recursos da VM no arquivo instance.tf
        ↓
5. Executar terraform init → terraform plan → terraform apply
        ↓
6. VM provisionada e disponível na plataforma! 🎉
- Utilize workspaces para separar ambientes de desenvolvimento, homologação e produção.
- Armazene o state remotamente (ex.: em um bucket S3 ou no Terraform Cloud) para trabalho em equipe.
- Nunca commite o
terraform.tfvarscom credenciais em repositórios públicos. - Use o
terraform plansempre antes doapplypara revisar as mudanças que serão aplicadas. - Versione seus módulos para garantir estabilidade ao longo do tempo.
🧠 Dúvidas?
Entre em contato com o suporte técnico e envie sua dúvida que estaremos à disposição para te ajudar!