🌐 Kubernetes Cluster Management
This guide simply shows how to Manage a Kubernetes Cluster on Nuvion by SaveinCloud.
🚀 1. SSH Access to the Cluster
-
You can access the master and worker nodes of Kubernetes via SSH, using the assigned SSH key and the core user name.
-
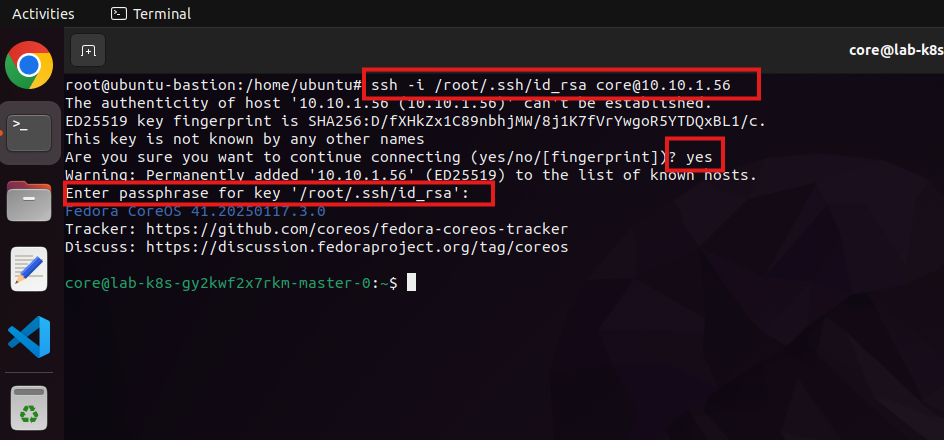
From our Linux Bastion VM we will access SSH with the private key and local IP of the Master Node (Control Plane) of the Kubernetes Cluster with the command below:
ssh -i /root/.ssh/id_rsa [email protected]
🚀 2. Access to the Kubernetes Dashboard
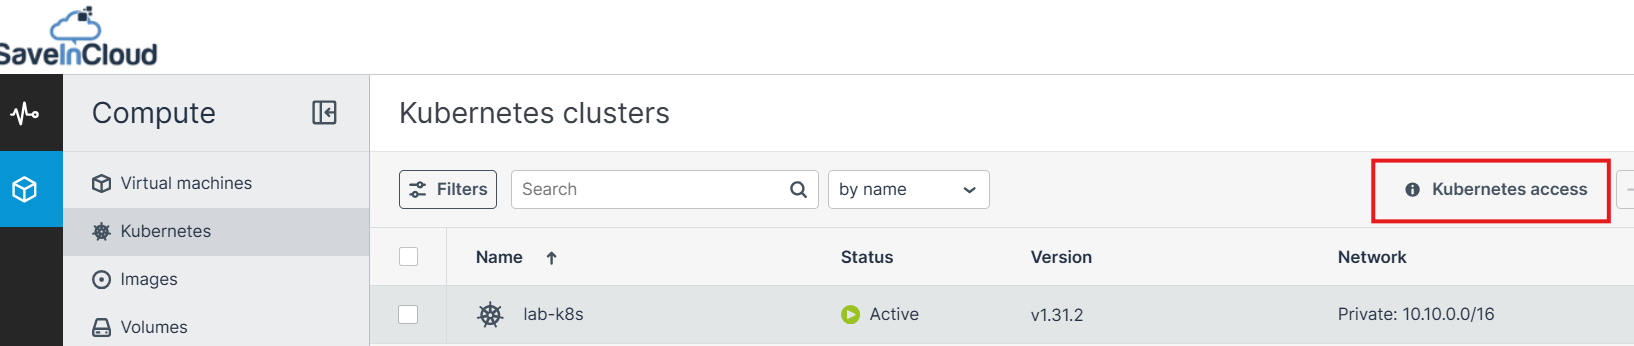
- After the cluster is ready, click on Access Kubernetes to get instructions on how to access the control panel.
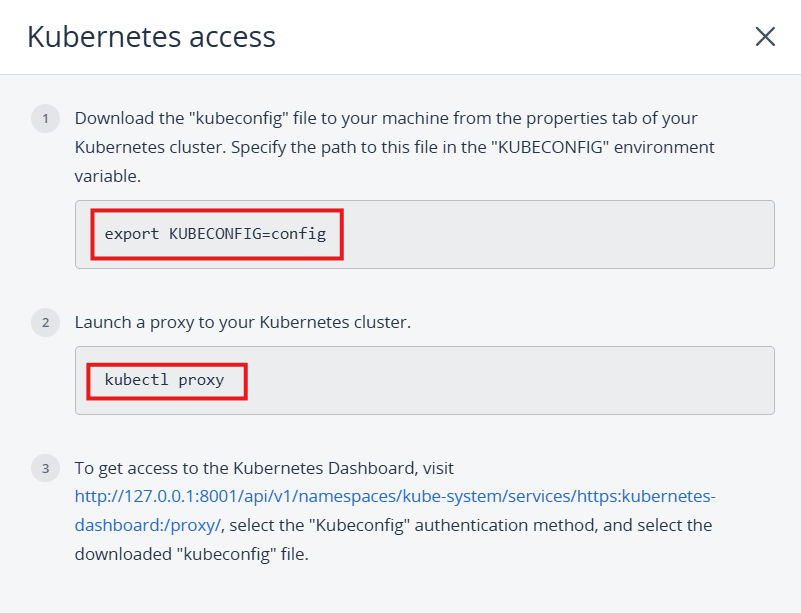
- Download the "kubeconfig" file to your machine from the properties tab of your Kubernetes cluster. Specify the path to this file in the "KUBECONFIG" environment variable.
export KUBECONFIG=config
- Start a proxy for your Kubernetes cluster.
kubectl proxy
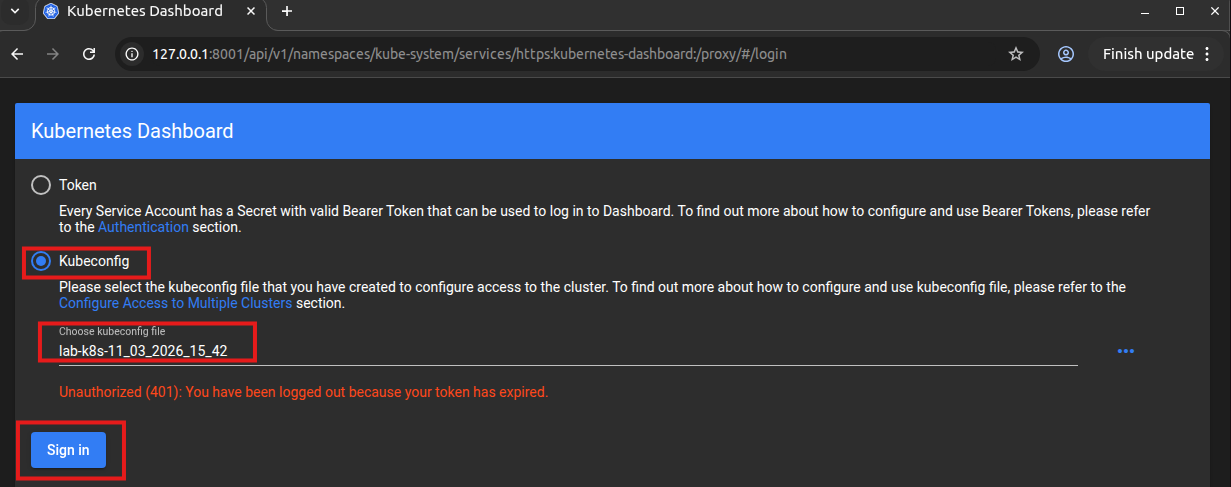
- To access the Kubernetes dashboard, visit http://127.0.0.1:8001/api/v1/namespaces/kube-system/services/https:kubernetes-dashboard:/proxy/, select the authentication method "Kubeconfig" and select the downloaded "kubeconfig" file.

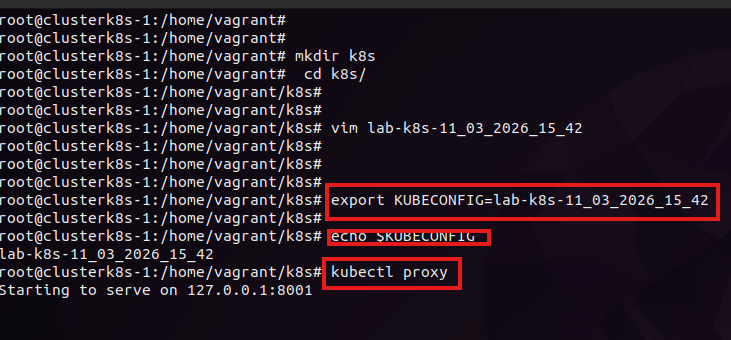
- In this part, we will configure access to the Kubernetes dashboard on our local machine following the step-by-step above. On our machine, I will create a folder named k8s, inside it create a file and copy the content of the downloaded KUBECONFIG into this new file, then exit and save:
mkdir k8s
cd k8s/
vim lab-k8s-11_03_2026_15_42
- Now we will run export KUBECONFIG=file and then the echo command to validate if the file is in the KUBECONFIG environment variable; if everything is configured correctly, next we can run the kubectl proxy command:
echo $KUBECONFIG
-
Next, open your browser, paste the link generated by Kubernetes Access.
-
Select the authentication method "Kubeconfig" and select the downloaded "kubeconfig" file and click the Sign in button, as shown in the screenshot below.
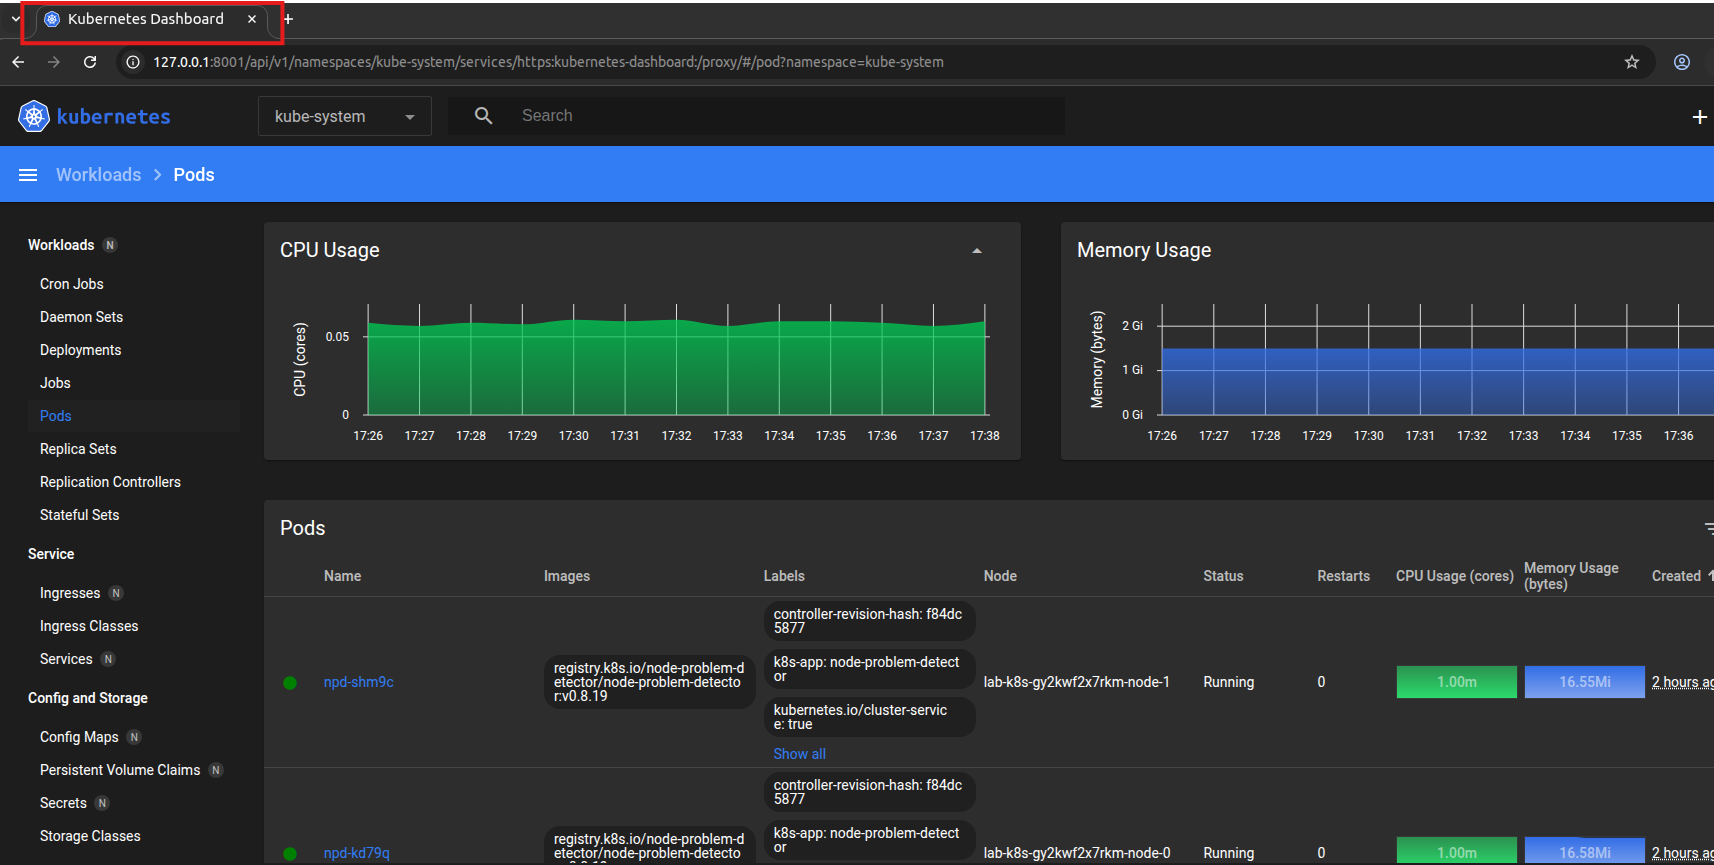
- After access configuration, below is a demonstration image of the Kubernetes Cluster DASHBOARD.
🚀 3. Creating Namespaces
-
In Kubernetes, a namespace is used to separate resources within the cluster (pods, services, deployments, etc.). It is very common to separate environments, teams, or applications.
-
Create namespace with kubectl
Run:
kubectl create namespace meu-namespace
Examples:
kubectl create namespace treinamento
kubectl create namespace homolog
kubectl create namespace producao
- Check existing namespaces:
kubectl get namespaces
kubectl get ns
- Create resources in a specific namespace
Run:
kubectl create deployment nginx --image=nginx -n treinamento
or
kubectl get pods -n treinamento
- Set default namespace in kubectl (to avoid always using -n)
Run:
kubectl config set-context --current --namespace=treinamento
🚀 4. Creating Storage Class
-
Kubernetes allows the use of compute volumes as persistent storage for pods. Persistent volumes (PVs) exist independently of pods, meaning such a volume persists even after the deletion of the pod it is mounted on. This PV can be mounted on other pods to access the data stored in it. You can dynamically provision PVs, without needing to create them manually, or statically, using volumes that already exist in the compute cluster.
-
To create a storage class we will create a manifest file named storage-class.yaml, paste the content below, save the file and exit:
apiVersion: storage.k8s.io/v1
kind: StorageClass
metadata:
  name: default
  annotations:
    storageclass.kubernetes.io/is-default-class: "true"
provisioner: cinder.csi.openstack.org
parameters:
  type: default
-
This manifest describes the default storage class with the default storage policy. It also marks this storage policy as default for the Kubernetes cluster. The storage policy must exist in the compute cluster and be specified in the current project's storage quotas.
-
Next run the following command:
kubectl apply -f storage-class.yaml
- Check existing storage classes:
kubectl get storageclass
kubectl get sc
🚀 5. Static Provisioning of Persistent Volumes
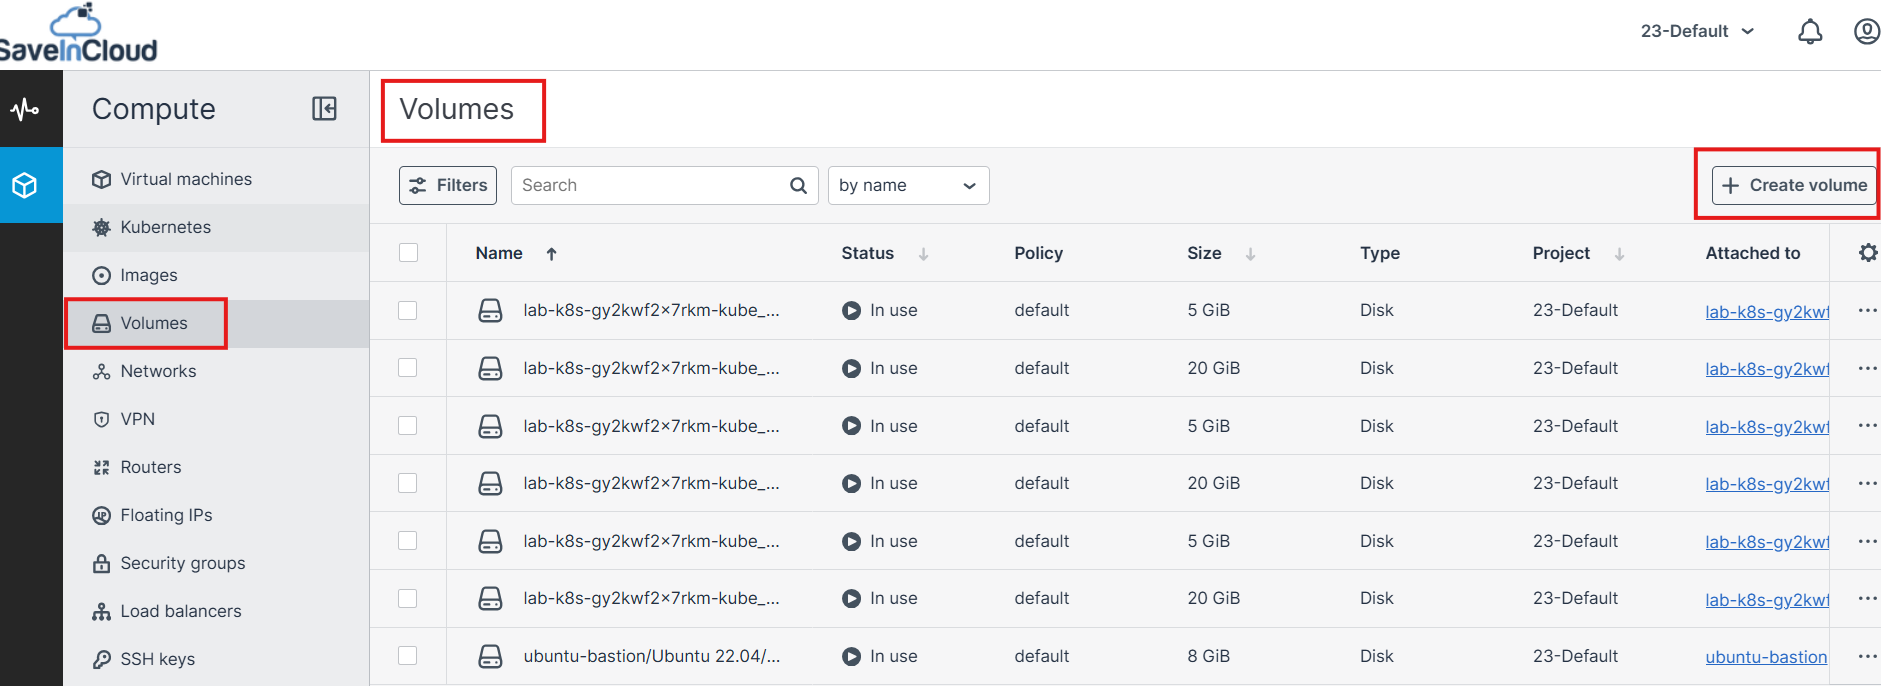
- In the Nuvion Panel we will navigate to the Volumes screen, and then create a new volume by clicking the Create Volume button:
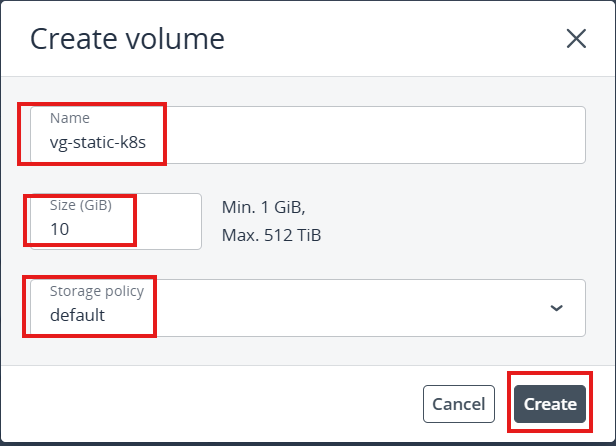
- In the window that opens, we will set the name, example: vg-static-k8s, set the Size to 10GB and the Storage Policy will be Default, then click the Create button:
- After creating the new volume in the panel, we will click on it, and in the side window we will copy the ID number of this volume, then paste this ID number in the static persistent volume creation manifest file.
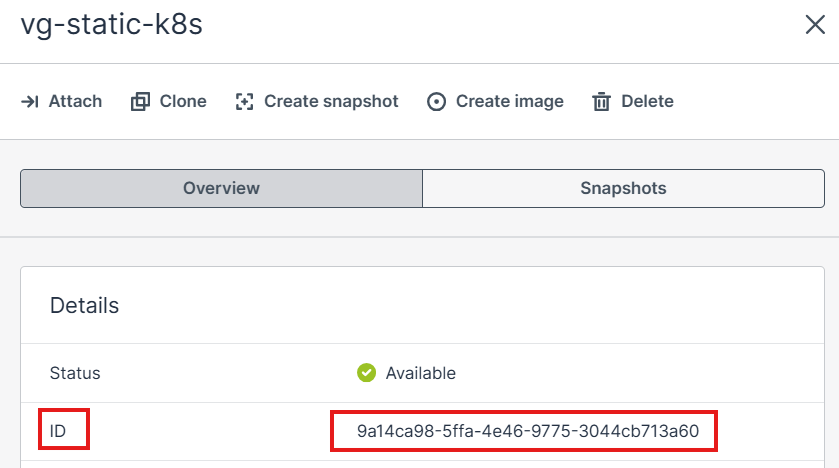
- Now we will create our manifest file named pv-static.yaml to add a static persistent volume to our cluster, copy the content below and paste it into your file, on the line where the VolumeHandle field is, paste the ID of our new volume created in the panel, then save and exit:
apiVersion: v1
kind: PersistentVolume
metadata:
  annotations:
    pv.kubernetes.io/provisioned-by: cinder.csi.openstack.org
  name: mypv
spec:
  accessModes:
  - ReadWriteOnce
  capacity:
    storage: 10Gi
  csi:
    driver: cinder.csi.openstack.org
    fsType: ext4
    volumeHandle: 9a14ca98-5ffa-4e46-9775-3044cb713a60
  persistentVolumeReclaimPolicy: Delete
  storageClassName: default
- Next run the following command:
kubectl apply -f pv-static.yaml
- Check existing static persistent volumes:
kubectl get pv
🚀 6. Dynamic Provisioning of Persistent Volumes
- Persistent volumes can be dynamically provisioned through persistent volume claims (PVCs). A PVC requests a PV of a specific storage class, access mode, and size. If a suitable PV exists in the cluster, it will be bound to the claim. If no suitable PVs exist but can be provisioned, a new volume will be created and bound to the claim. Kubernetes uses a PVC to get the corresponding PV and mounts it on the pod.
Prerequisites
-
A pod and the persistent volume claim it uses must exist in the same namespace.
-
We will create our manifest file named pv-dinamic.yaml to add a dynamic persistent volume to our cluster, we will also set a size of 2Gi for this volume, copy the content below and paste it into your file, then save and exit:
apiVersion: v1
kind: PersistentVolumeClaim
metadata:
  name: mypvc1
spec:
  accessModes:
  - ReadWriteOnce
  resources:
    requests:
      storage: 2Gi
  storageClassName: default
-
This manifest file specifies the persistent volume claim mypvc that requires from the default storage class a volume of at least 1 GiB that can be mounted in read/write mode by a single node.
-
Next run the following command:
kubectl apply -f pv-dinamic.yaml
- Check existing dynamic persistent volumes:
kubectl get pvc
- To delete a PVC (PersistentVolumeClaim) use the command:
kubectl delete pvc nome-do-pvc -n namespace
- Example of creating an nginx pod with dynamic persistent volume:
apiVersion: apps/v1
kind: Deployment
metadata:
  name: nginx
spec:
  replicas: 1
  selector:
    matchLabels:
      app: nginx
  template:
    metadata:
      labels:
        app: nginx
    spec:
      containers:
      - image: nginx
        imagePullPolicy: IfNotPresent
        name: nginx
        ports:
        - container: 80
          protocol: TCP
        volumeMounts:
          - mountPath: /var/lib/www/html
            name: mydisk
      volumes:
        - name: mydisk
          persistentVolumeClaim:
            claimName: mypvc1
- Run
kubectl apply -f nginx-mypv-pod.yaml
🚀 7. Ingress Controllers in Kubernetes
-
For this scenario we will install Traefik as the ingress controller of our Kubernetes cluster.
-
To install Traefik on Kubernetes, we will use the Helm package manager to add the official repository, create a dedicated namespace and install the chart.
Installation steps:
- Add the Helm repository:
helm repo add traefik https://helm.traefik.io/traefik
- Update the repository:
helm repo update
-Create a dedicated namespace (recommended):
kubectl create ns traefik
-Install Traefik:
helm install traefik traefik/traefik -n traefik
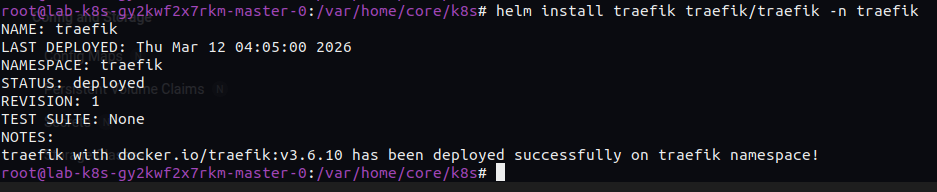
- Upon completing the installation of Traefik in our Kubernetes cluster it will return the following message in your shell, as shown in the screenshot below:
- Check if the Traefik pod is running in the Traefik namespace:
kubectl get pods -o wide -n traefik
🧠 Questions?
Contact our SaveinCloud technical support team!