Restricted Bucket Access in Storin (Write-Only and Read-Only)
⚠️ All configurations in this guide are examples. Adapt bucket names, profiles, and User IDs to your environment.
📌 Overview
This guide shows how to share a Storin bucket with restricted access, for example:
- a credential that can only upload files (write-only), useful for applications that upload backups or logs;
- a credential that can only read and list files (read-only), useful for auditing, querying, or processing.
Access control is done through a Bucket Policy.
The examples in this guide use the AWS CLI, but the same procedure can be done via the S3 API, MinIO Client (mc), or any other S3-compatible tool. The Bucket Policy (JSON) is the same; only the command used to apply it changes.
🧠 How Storin applies permissions
In Storin, permissions are not applied to the Access Key or Secret Key individually. They are applied to the User ID (S3 identity) that the credential belongs to.
In practice:
- Each project in the panel has one S3 identity, with its own User ID.
- All Access Keys generated within the same project use the same User ID and therefore have exactly the same permissions.
- Keys are only used to authenticate the identity. What can or cannot be done is defined by the User ID referenced in the policy.
To have different access profiles (owner, write-only, read-only), each profile needs a different User ID, which means a different project.
Generating a new Access Key/Secret Key in the same project does not create a new identity.
Example structure
| Project | User ID | Purpose |
|---|---|---|
| Main project | USER_OWNER | Bucket owner |
| Writer project | USER_WRITER | Write-only |
| Reader project | USER_READER | Read-only |
The Bucket Policy is set on the bucket of the Main project, referencing USER_WRITER and USER_READER.
🧰 Prerequisites
- A bucket already created in the main project (the bucket owner).
- An S3-compatible tool. This guide uses the AWS CLI; if you haven't set it up yet, follow the guide Configuring the AWS CLI with Storin.
jqinstalled (optional, used to validate the policy JSON before applying it).
🆔 Part 1 – Creating the identities (User IDs)
Repeat the steps below once for each restricted profile (one project for the Writer and another for the Reader).
Step 1 – Create a new project
In the panel, create a new project. It can be in the same account or in a different account from the one that holds the bucket.
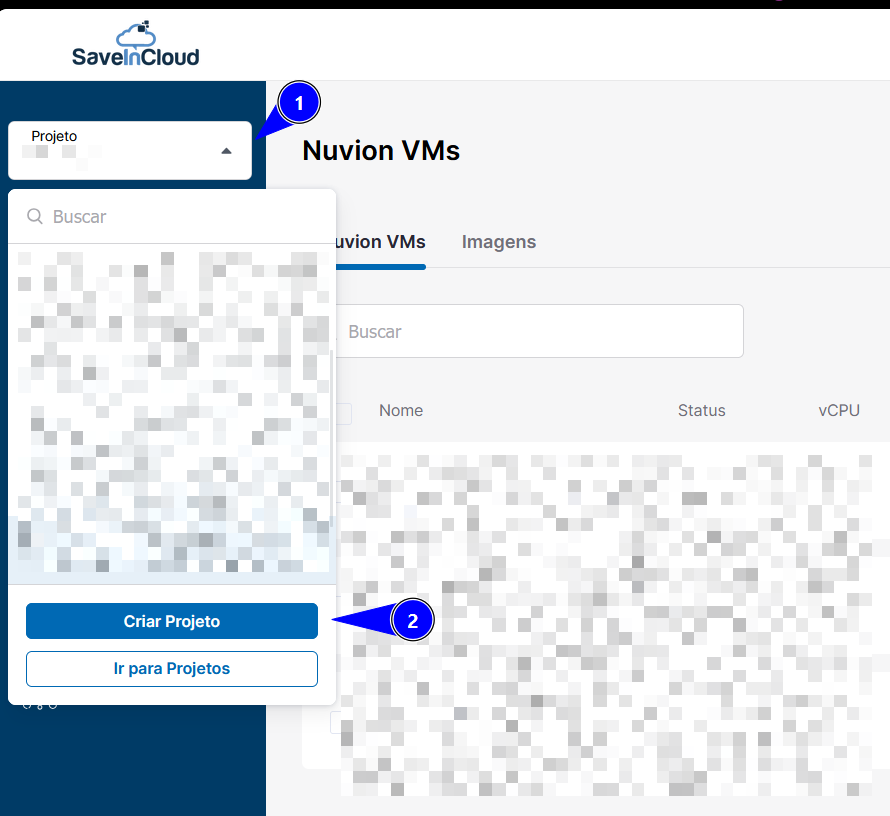
Step 2 – Initialize the S3 identity
The project's S3 identity is generated the first time Object Storage is used. To initialize it, create a temporary bucket in this project and then delete it.
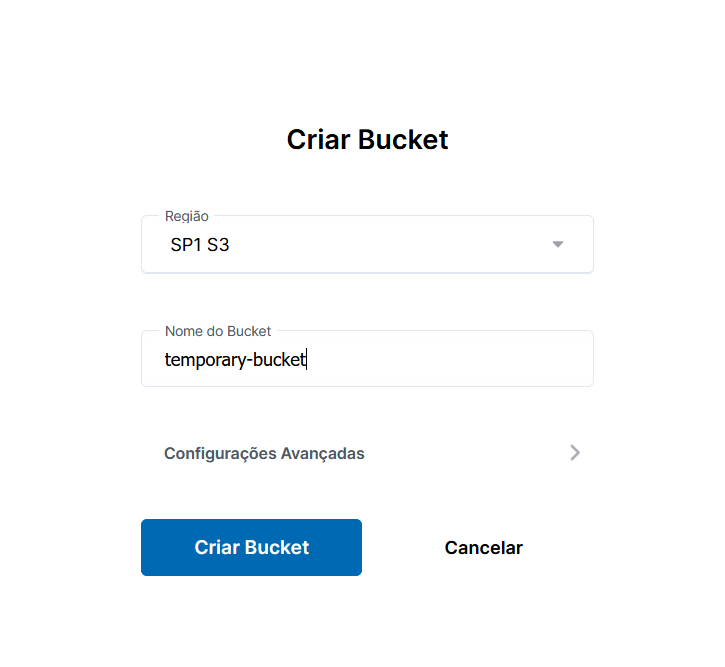
The temporary bucket is only used to generate the identity. It can be deleted right away with no impact on the User ID.
Step 3 – Copy the User ID
Go to the project's Access tab and copy the User ID shown.
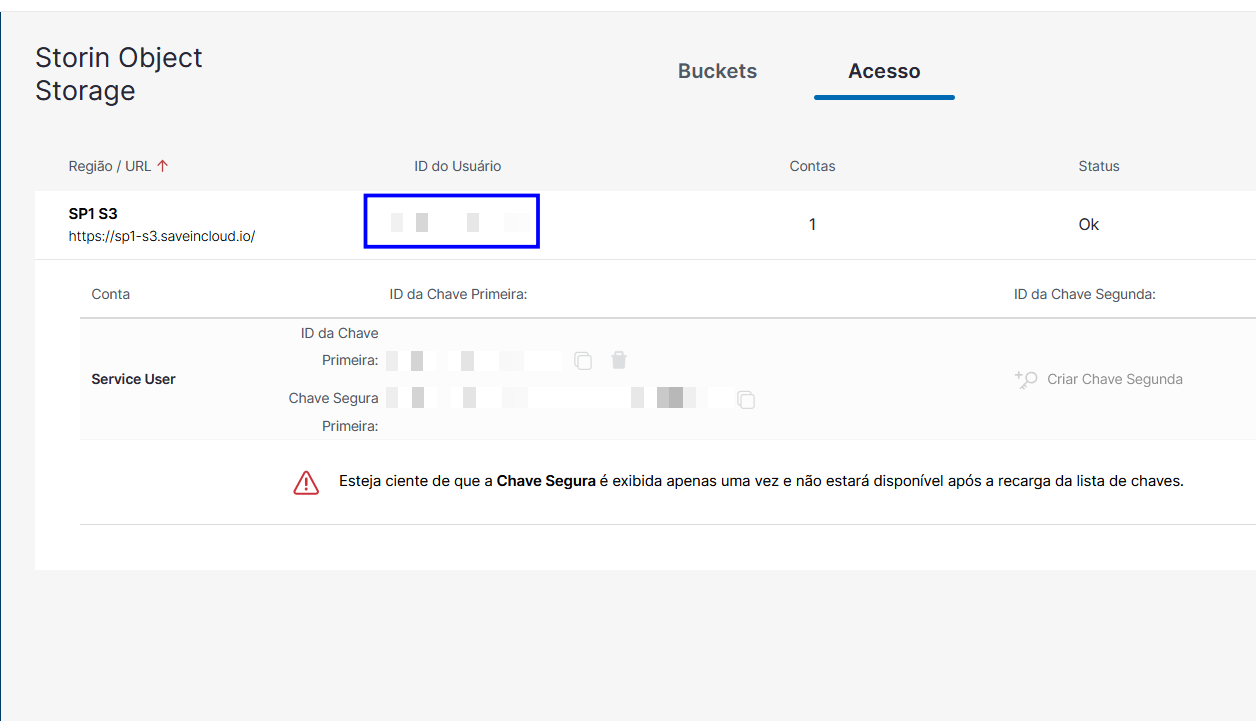
Step 4 – Generate the Access Key and Secret Key
Still in the Access tab, generate the project's Access Key and Secret Key and store them in a safe place. They will be used by the application or person who will have the restricted access.

The Secret Key is only shown at creation time. Store it immediately in a safe place, such as a password manager.
At the end of this part, you will have:
| Profile | User ID | Credentials |
|---|---|---|
| Writer | <WRITER_ID> | Access Key + Secret Key |
| Reader | <READER_ID> | Access Key + Secret Key |
⚙️ Part 2 – Configuring the AWS CLI
Configure one profile for each identity (owner, writer, and reader).
~/.aws/config file
[profile storin-owner]
region = sp1
output = json
request_checksum_calculation = when_required
response_checksum_validation = when_required
endpoint_url = https://sp1-s3.saveincloud.io

[profile storin-writer]
region = sp1
output = json
request_checksum_calculation = when_required
response_checksum_validation = when_required
endpoint_url = https://sp1-s3.saveincloud.io

[profile storin-reader]
region = sp1
output = json
request_checksum_calculation = when_required
response_checksum_validation = when_required
endpoint_url = https://sp1-s3.saveincloud.io
~/.aws/credentials file
[storin-owner]
aws_access_key_id = <ACCESS_KEY_OWNER>
aws_secret_access_key = <SECRET_KEY_OWNER>

[storin-writer]
aws_access_key_id = <ACCESS_KEY_WRITER>
aws_secret_access_key = <SECRET_KEY_WRITER>

[storin-reader]
aws_access_key_id = <ACCESS_KEY_READER>
aws_secret_access_key = <SECRET_KEY_READER>
The request_checksum_calculation and response_checksum_validation lines are required on AWS CLI 2.25 or later. Without them, every upload fails with ValidationError.
Adjust the endpoint_url according to your bucket's region (for example, https://sp1-s3.saveincloud.io or https://bsb1-s3.saveincloud.io).
📝 Part 3 – Creating and applying the Bucket Policy
Step 1 – Create the policy file
Create a file named policy.json with the content below:
{
  "Version": "2012-10-17",
  "Statement": [
    {
      "Sid": "AllowWrite",
      "Effect": "Allow",
      "Principal": { "CanonicalUser": "<WRITER_ID>" },
      "Action": [
        "s3:PutObject",
        "s3:AbortMultipartUpload",
        "s3:ListMultipartUploadParts"
      ],
      "Resource": "arn:aws:s3:::<BUCKET>/*"
    },
    {
      "Sid": "DenyReadForWriter",
      "Effect": "Deny",
      "Principal": { "CanonicalUser": "<WRITER_ID>" },
      "Action": [
        "s3:GetObject",
        "s3:GetObjectVersion",
        "s3:DeleteObject",
        "s3:DeleteObjectVersion"
      ],
      "Resource": "arn:aws:s3:::<BUCKET>/*"
    },
    {
      "Sid": "AllowReadObjects",
      "Effect": "Allow",
      "Principal": { "CanonicalUser": "<READER_ID>" },
      "Action": ["s3:GetObject", "s3:GetObjectVersion"],
      "Resource": "arn:aws:s3:::<BUCKET>/*"
    },
    {
      "Sid": "AllowListForReader",
      "Effect": "Allow",
      "Principal": { "CanonicalUser": "<READER_ID>" },
      "Action": ["s3:ListBucket"],
      "Resource": ["arn:aws:s3:::<BUCKET>", "arn:aws:s3:::<BUCKET>/*"]
    }
  ]
}
Replace:
| Variable | Value |
|---|---|
<WRITER_ID> | User ID of the Writer project |
<READER_ID> | User ID of the Reader project |
<BUCKET> | Name of the bucket being shared |
What each block does
| Sid | Profile | Effect |
|---|---|---|
AllowWrite | Writer | Allows uploading objects, including multipart uploads |
DenyReadForWriter | Writer | Blocks reading and deleting, including objects it uploaded itself |
AllowReadObjects | Reader | Allows downloading objects and their versions |
AllowListForReader | Reader | Allows listing the bucket contents |
Step 2 – Apply the policy
The policy must be applied with the bucket owner's credential. AWS CLI example:
jq . policy.json && aws --profile storin-owner s3api put-bucket-policy \
  --bucket <BUCKET> \
  --policy file://policy.json
jq validates the JSON before sending it. If there is a syntax error, the command stops before applying the policy.
To check the applied policy:
aws --profile storin-owner s3api get-bucket-policy --bucket <BUCKET>
❗ Mandatory rules
These rules apply to any tool used to apply the policy.
CanonicalUserThe Principal must use CanonicalUser with the hexadecimal User ID. The forms below do not work in Storin and may return 403:
"Principal": { "AWS": "<id>" }
"Principal": { "AWS": "arn:aws:iam:::user/<id>" }
DenyReadForWriter block is mandatoryWhoever performs the PUT of an object becomes the owner of that object and can read it through ACL. Without the explicit Deny, the Writer can read everything it uploaded itself.
The bucket owner always has full access, because ownership takes precedence over the policy. That is why the restricted credential must belong to an identity different from the owner's, that is, to another project.
✅ Part 4 – Validating the permissions
The tests below use the AWS CLI. With another tool, run the equivalent operations (upload, download, list, and delete) with each credential and compare against the expected results table.
Create a test file:
echo "test" > /tmp/t.txt
Writer (write-only)
# Should SUCCEED
aws --profile storin-writer s3api put-object --bucket <BUCKET> --key wr.txt --body /tmp/t.txt

# Should return 403 (AccessDenied)
aws --profile storin-writer s3api get-object --bucket <BUCKET> --key wr.txt /tmp/x.txt
aws --profile storin-writer s3api list-objects-v2 --bucket <BUCKET>
aws --profile storin-writer s3api delete-object --bucket <BUCKET> --key wr.txt
Test the Writer's GET on an object it created itself (like wr.txt above). This is the scenario that proves DenyReadForWriter is working.
Reader (read-only)
# Should SUCCEED
aws --profile storin-reader s3api get-object --bucket <BUCKET> --key wr.txt /tmp/y.txt
aws --profile storin-reader s3api list-objects-v2 --bucket <BUCKET>

# Should return 403 (AccessDenied)
aws --profile storin-reader s3api put-object --bucket <BUCKET> --key ot.txt --body /tmp/t.txt
aws --profile storin-reader s3api delete-object --bucket <BUCKET> --key wr.txt
Expected results
| Identity | PUT | GET | LIST | DELETE |
|---|---|---|---|---|
| Owner | ✅ | ✅ | ✅ | ✅ |
| Writer | ✅ | ❌ | ❌ | ❌ |
| Reader | ❌ | ✅ | ✅ | ❌ |
🛠️ Troubleshooting – Common Issues
❌ 403 AccessDenied when applying or using the policy
- Check that the
Principaluses the format"CanonicalUser": "<USER_ID>". - Confirm the copied User ID belongs to the correct project (Access tab).
- Confirm the policy was applied with the bucket owner's credential.
❌ ValidationError on every upload (AWS CLI)
The checksum lines are missing from ~/.aws/config. Add them to the profile:
request_checksum_calculation = when_required
response_checksum_validation = when_required
❌ The Writer can read its own files
The DenyReadForWriter block is missing from the policy or has the wrong User ID. Review the policy and apply it again.
❌ The "restricted" credential has full access
The Access Key was generated in the same project as the bucket owner. Keys from the same project share the same User ID. Create a separate project for the restricted profile, as described in Part 1.
❌ The Reader cannot list the bucket
The s3:ListBucket action requires both resources: arn:aws:s3:::<BUCKET> and arn:aws:s3:::<BUCKET>/*.
The Writer can upload an object with an existing key, replacing the previous content. If this is a risk in your case, use unique keys when uploading (for example, with the date and time in the name) or enable versioning on the bucket.
📘 Related documentation: Configuring the AWS CLI with Storin